jwallace.us

tech, tunes, and other stuff

Common Linux Sysadmin Commands

I am constantly having to use these commands when administering remote systems. I’ll just put them in one place for future reference.

Change all directories and subdirectories to a specific user and group find . -type d -exec chown user:group {} +

Change all files in the current directory and all subdirectories to a specific user and group find . -type f -exec chown user:group {} +

Setting the time zone dpkg-reconfigure tzdata

Generate a 4096 byte SSH key ssh-keygen -t rsa -b 4096 -f id_rsa_user -C user

Upgrading to Windows 10

The deadline for installing Windows 10 as a free upgrade is July 29. You may have heard Microsoft made it free because Microsoft sees it as a tool to gather information about you so they may sell it for profit. So it remains, nothing is rarely ever free and there always seems to be a catch. When upgrading, follow these steps to minimize Microsoft’s snooping into your life.

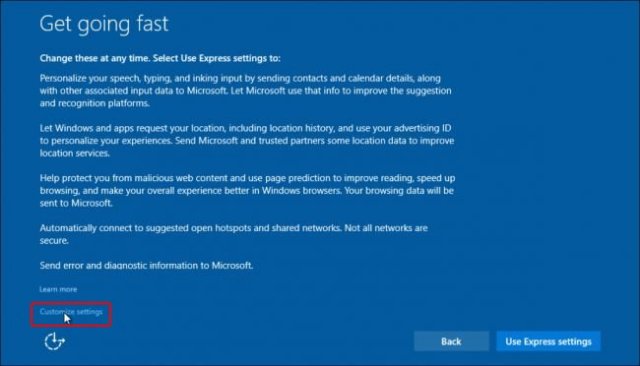
When upgrading, you will first be given the option to customize your installation settings. If you go too fast, you’ll miss it. The customize settings is in small text at the bottom left. Choose that.

Windows 10 Installation 00

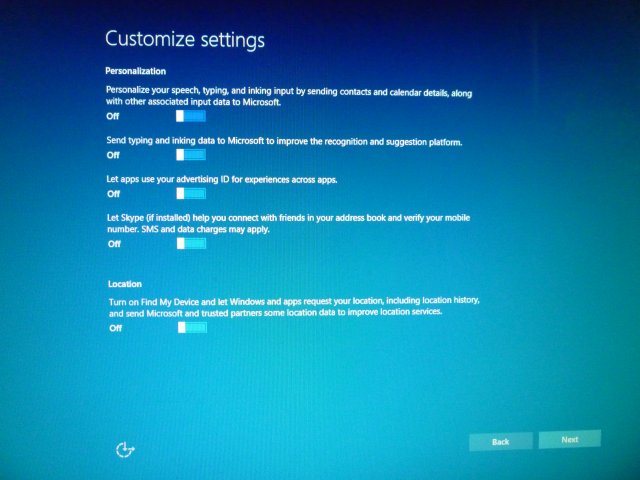
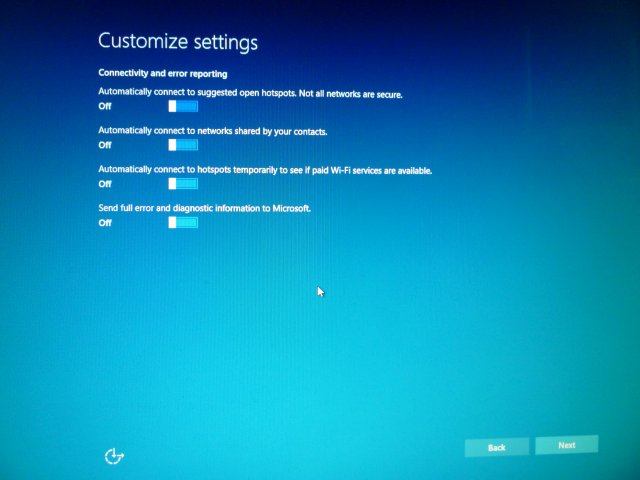
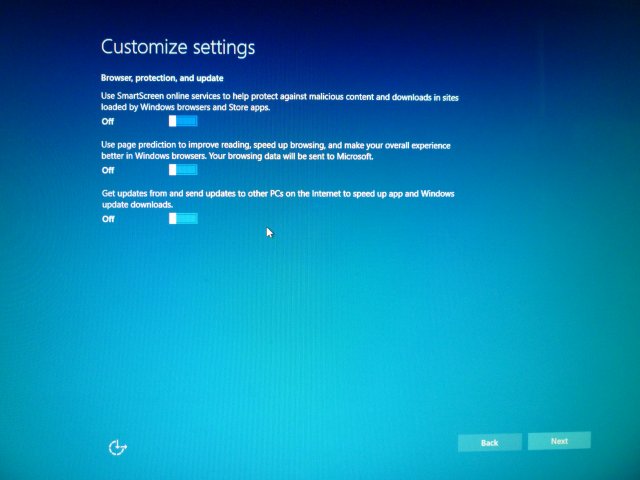
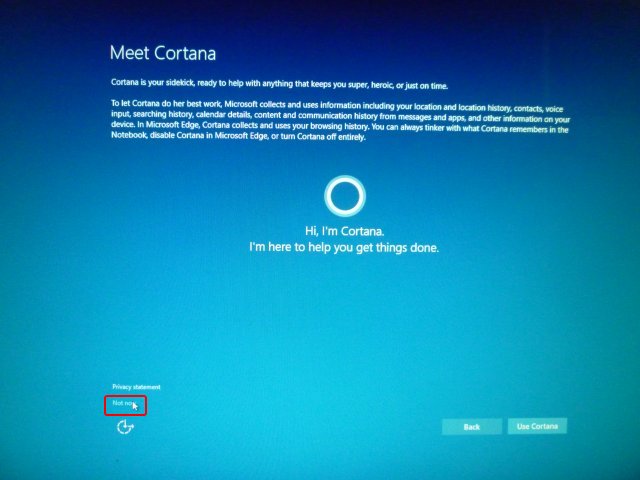
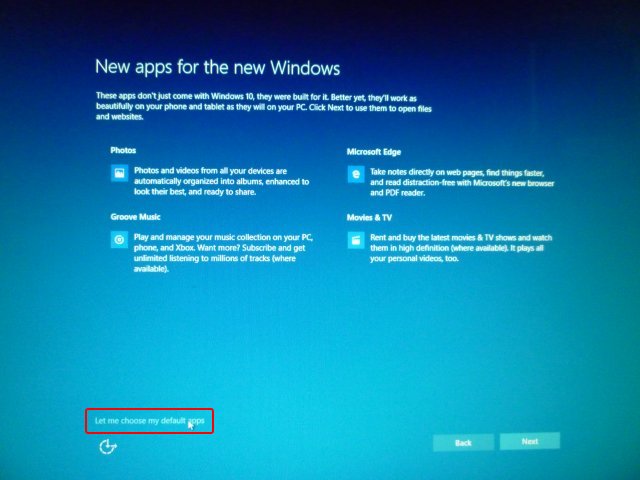
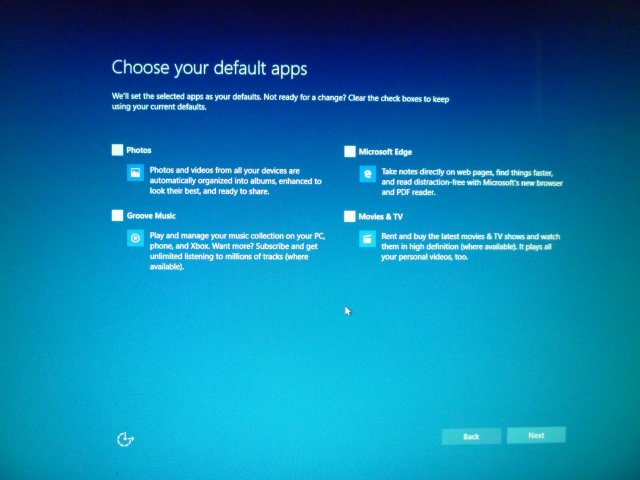
Next you will be presented with these screens. Make the choices shown below.

Windows 10 Installation 01

Windows 10 Installation 02

Windows 10 Installation 03

You don’t want Cortana.

Windows 10 Installation 04

Be sure to choose your default apps yourself.

Windows 10 Installation 05

Windows 10 Installation 06

After upgrading, download, install, and run ShutUp10 choosing the recommended settings:

Shutup10: Free antispy tool for Windows 10

Finally, to reclaim your start button you can get this utility. 30 day free trial. Its only $5:

Start10, the first Windows 10 Start menu alternative.

Overall I think Windows 10 is a decent operating system provided you set it up correctly and minimize Microsoft’s spying.

Crooked Hillary

Crooked Hillary becomes the Democrat party’s nominee.
Note the God-like glow. She had CNN do that for her. What a phony.

Crooked Crooked Hillary

Adobe to Apache Flex

Some time ago Adobe open sourced their Flex programming language over to Apache. I have some old Adobe Flex based programs that I wanted to move over to using the new Apache Flex. After downloading the new SDK, I tried to compile the Flex source code, and I was presented the following error message:

Error: unable to open '{playerglobalHome}/11.1/playerglobal.swc

The fix for this error is to go into the Apache Flex SDK installation directory and do the following.

First you will need the playerglobal.swc file. Currently the only version supported by Apache is 11.1. Download it here: http://fpdownload.macromedia.com/get/flashplayer/updaters/11/playerglobal11_1.swc

Next you’ll want to put it in the location the Apache Flex SDK will be expecting it. On my system, I would do this:

mkdir -p /home/john/apache-flex-sdk-4.15.0-bin/frameworks/libs/player/11.1

With that command, the player/11.1 directories would be created. Now copy the file into the location. Note we are renaming the file in the process:

cp playerglobal11_1.swc /home/john/apache-flex-sdk-4.15.0-bin/frameworks/libs/player/11.1/playerglobal.swc

Now you want to copy the env-template.properties file to env.properties:

cp /home/john/apache-flex-sdk-4.15.0-bin/env-template.properties /home/john/apache-flex-sdk-4.15.0-bin/env.properties

Finally, edit the env.properties file and find the env.PLAYERGLOBAL_HOME setting. Change it to the path that contains the :

1
2
3
4
5
6
7
8
9
10
11
12
13
14
15
#
# PLAYERGLOBAL_HOME is a directory which contains one or more subdirectories.
# The name of each subdirectory corresponds to a supported target player version and
# in each of the subdirectories is the playerglobal.swc that corresponds to that target
# player.  The default
#
# For this sample directory structure, set PLAYERGLOBAL_HOME to the full path of the
# player directory.
#
#       - player (dir)
#           - 11.1 (dir)
#               playerglobal.swc (file)
#
#env.PLAYERGLOBAL_HOME=
env.PLAYERGLOBAL_HOME=/home/john/apache-flex-sdk-4.15.0-bin/frameworks/libs/player/

You’re done. To test this you can compile the sample program below.

Use the following command to compile: mxmlc -compiler.optimize -compiler.as3 FlashVersion.mxml

FlashVersion.mxml
1
2
3
4
5
6
7
8
9
10
11
12
13
14
15
16
17
18
19
20
21
22
23
24
25
26
27
28
29
30
31
32
<?xml version="1.0"?>
<!-- FlashVersion.mxml -->
<s:Application
    xmlns:fx="http://ns.adobe.com/mxml/2009"
    xmlns:s="library://ns.adobe.com/flex/spark"
    xmlns:mx="library://ns.adobe.com/flex/mx">

    <s:layout>
        <s:VerticalLayout/>
    </s:layout>

    <fx:Script>
        <![CDATA[
        import flash.system.Capabilities;

        private function reportVersion():String {
            if (Capabilities.isDebugger) {
                return "Flash Debug";
            } else {
                return "Flash Player";
            }
        }
        private function reportType():String {
            return Capabilities.playerType + " (" + Capabilities.version + ")";
        }
        ]]>
    </fx:Script>

    <s:Label text="{reportVersion()}"/>
    <s:Label text="{reportType()}"/>

</s:Application>

Automated PostgreSQL Backups

You can use the linux scheduler cron to automate backups of your postgres database. First as root, you’ll want to log in as the postgres user since we’ll be doing a number of things in that account:

su - postgres

Assuming you have a database named “mydb”, lets set up a small script in the postgres account. On Ubuntu & Linux Mint the account is in /var/lib/postgresql, and on Red Hat & CentOS you’ll find it in /var/lib/pgsql. For now, lets assume Ubuntu. Here is the script:

/var/lib/postgresql/db_backup.sh
1
2
3
4
5
6
7
8
9
10
11
#!/bin/sh
cd /var/lib/postgresql
prefix=mydb_
CURRENT=$(date "+%y%m%d-%H%M%S")
suffix=.sql
pg_dump -U postgres -w mydb > ${prefix}${CURRENT}${suffix}
chown postgres:postgres ${prefix}${CURRENT}${suffix}
gzip -9 ${prefix}${CURRENT}${suffix}
chown postgres:postgres ${prefix}${CURRENT}${suffix}.gz
chmod 644 ${prefix}${CURRENT}${suffix}.gz
mv ${prefix}${CURRENT}${suffix}.gz /var/lib/postgresql/backups

Make sure you give your script execute permissions:

chmod 755 db_backup.sh

You also want to create the backups directory where your sql dump will be archived:

mkdir backups

Next you’ll need to set up our postgres credentials in a .pgpass file:

/var/lib/postgresql/.pgpass
1
localhost:5432:mydb:postgres:dbPa$$w0Rd

You will need to set the parmissions for .pgpass to 600.

chmod 600 .pgpass

Also, since cron will run as root, you’ll need to copy the .pgpass file over to root’s home directory:

sudo cp .pgpass ~root

Finally, you’ll want to run “crontab -e” as root to schedule when your new backup script will run. This entry will have the system run the script at 00:00:00 every day:

@daily /var/lib/postgresql/db_backup.sh

Tomcat 7 HTTPS With No CA

You can create a self signed server certificate and a server key for Tomcat without having to go through a certificate authority. First, create the certificate and key:

openssl req -x509 -newkey rsa:2048 -keyout server.key -out server.crt -days XXX

Next set up a keystore, just leave out the CA root file:

openssl pkcs12 -export -in server.crt -inkey server.key -out my_cert.p12 -name tomcat

Next edit Tomcat’s server.xml:

/var/lib/tomcat7/conf/server.xml
1
2
3
4
5
<!-- Define a SSL Coyote HTTP/1.1 Connector on port 8443 -->
    <Connector protocol="org.apache.coyote.http11.Http11Protocol" port="8443" maxThreads="200"
     scheme="https" secure="true" SSLEnabled="true" keystoreType="PKCS12"
     keystoreFile="/var/lib/tomcat7/conf/my_cert.p12" keystorePass="djEwuDysjSIdc88w3"
     clientAuth="false" sslProtocol="TLS"/>

Finally, edit Tomcat’s web.xml, at the bottom add a security restraint to force all connections to use HTTP/s:

/var/lib/tomcat7/conf/web.xml
1
2
3
4
5
6
7
8
9
10
11
12
13
14
15
16
    <welcome-file-list>
        <welcome-file>index.html</welcome-file>
        <welcome-file>index.htm</welcome-file>
        <welcome-file>index.jsp</welcome-file>
    </welcome-file-list>

   <security-constraint>
      <web-resource-collection>
         <web-resource-name>Entire Application</web-resource-name>
         <url-pattern>/*</url-pattern>
      </web-resource-collection>
      <user-data-constraint>
         <transport-guarantee>CONFIDENTIAL</transport-guarantee>
      </user-data-constraint>
   </security-constraint>
</web-app>

Getting Iron to Work With Thunderbird

First set Iron to the default browser:

1
2
gvfs-mime --set x-scheme-handler/http iron.desktop
gvfs-mime --set x-scheme-handler/https iron.desktop

Happy Days Are Here Again

The Fed raised interest rates today for the first time since the beginning of the Great Recession. Do you know what that means? I think you do.